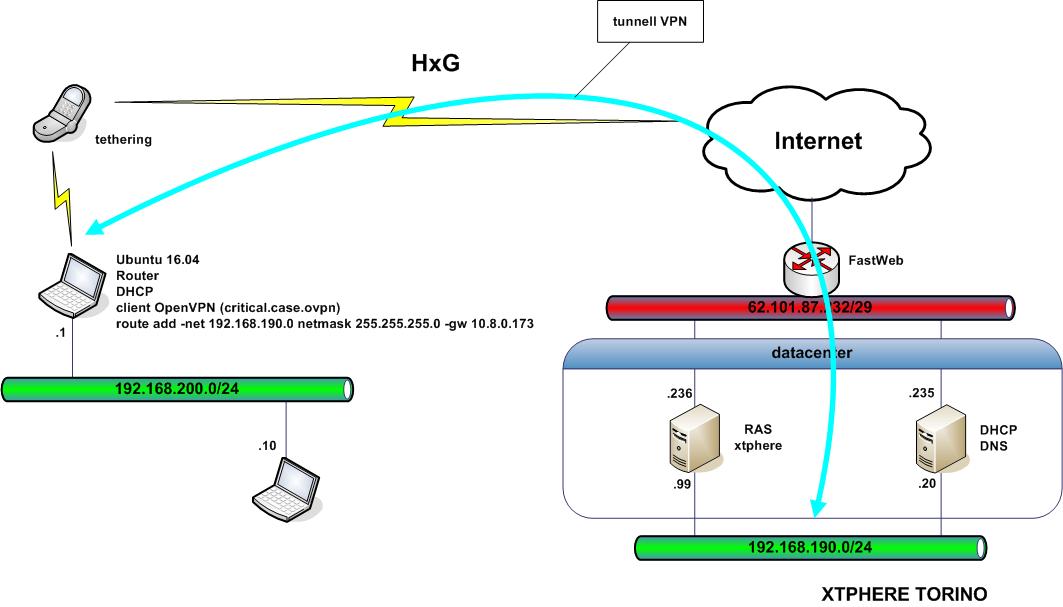
LAN = enp4s0f2
WAN = wlp3s0
Prima di tutto è necessario abilitare la funzionalità di IP forwarding
digitare il comando:
sudo nano /etc/sysctl.conf
e rimuovere il commento dalla direttiva:
net.ipv4.ip_forward=1
ricaricare il kernel con il comando:
sudo sysctl -p
configurare un indirizzo IP statico sull'interfaccia LAN che nel nostro caso si chiama enp4s0f2 editando il file /etc/network/interfaces
sudo nano /etc/network/interface
editare /etc/network/interfaces per il setup dell'indirizzo IP statico sull'interfaccia LAN
di seguito è riportata la configurazione:
# Private subnet
auto enp4s0f2
iface enp4s0f2 inet static
 address 192.168.200.1
 netmask 255.255.255.0
 dns-nameservers 8.8.8.8 8.8.4.4
 up sleep 10; route add -net 192.168.190.0 netmask 255.255.255.0 gw 10.8.0 173
installare il server DHCP per rilasciare indirizzi ai client collegati alla LAN con il comando:
sudo apt-get install isc-dhcp-server
fare una copia di sicurezza del file di config del server DHCP con il comando:
sudo cp /etc/dhcp/dhcpd.conf /etc/dhcp/dhcpd.conf_copia
svuotare il file di config originale con il comando:
echo "" | sudo tee /etc/dhcp/dhcpd.conf
editare il file /etc/dhcp/dhcpd.conf con il seguente comando:
sudo nano /etc/dhcp/dhcpd.conf
e popolarlo con la seguente configurazione:
# DHCP Server config
# The ddns-updates-style parameter controls whether or not the server will
# attempt to do a DNS update when a lease is confirmed. We default to the
# behavior of the version 2 packages ('none', since DHCP v2 didn't
# have support for DDNS.)
ddns-update-style none;
# If this DHCP server is the official DHCP server for the local
# network, the authoritative directive should be uncommented.
authoritative;
# Use this to send dhcp log messages to a different log file (you also
# have to hack syslog.conf to complete the redirection).
log-facility local7;
# Specify the domain name servers to specify for each subnet.
option domain-name-servers 8.8.8.8;
option domain-name-servers 8.8.4.4;
# DHCP Subnet configurations
# subnet - enp4s0f2
subnet 192.168.200.0 netmask 255.255.255.0 {
 default-lease-time 86400;
 max-lease-time 86400;
range 192.168.200.100 192.168.200.200;
 option routers 192.168.200.1;
 option subnet-mask 255.255.255.0;
 option broadcast-address 192.168.200.255;
}
editare il file /etc/default/isc-dhcp-server e specificare l'interfaccia LAN (nel nostro caso enp4s0f2) nella direttiva INTERFACES=""
INTERFACES="enp4s0f2"
configurare il firewall, se è installato ufw rimuoverlo perchè si usa iptables
Per rimuovere UFW:
sudo ufw disable
sudo apt-get remove ufw
nell'esempio l'interfaccia Internet si chiama wlp3s0
a seguire viene riportato il set di direttive da utilizzare per configurare correttamente iptables:
# Accept localhost traffic (local traffic to the system itself)
sudo iptables -A INPUT -i lo -j ACCEPT
# Accept all traffic related to established connections
sudo iptables -A INPUT -m conntrack --ctstate RELATED,ESTABLISHED -j ACCEPT
# Drop traffic coming from the Internet into our Internet-connected interface (except for traffic related to other established connections)
# Update this to match the interface name of your Internet-connected interface.
sudo iptables -A INPUT -i wlp3s0 -j DROP
# Accept traffic inbound from the local subnets we are acting as a router for.
# CHANGE THESE INTERFACE NAMES ACCORDING TO YOUR SETUP!
sudo iptables -A INPUT -i enp4s0f2 -j ACCEPT
# Since we don't want to have our system completely open to the Internet, we need
# to drop all other traffic coming to our network. This way, we can prevent the
# Internet at large from accessing our network directly from the Internet.
sudo iptables -A INPUT -j DROP
# Add rules to accept forwarding on the interfaces we are doing routing for.
# CHANGE THESE INTERFACE NAMES ACCORDING TO YOUR SETUP!
sudo iptables -A FORWARD -i enp4s0f2 -j ACCEPT
sudo iptables -A FORWARD -o enp4s0f2 -j ACCEPT
# Add rules to the NAT table to allow us to actually let traffic on the interfaces
# which we are doing routing for go out to the Internet masquerade as our Internet-
# connected interface.
#
# ADJUST THE IP RANGES HERE TO MATCH THE IP RANGES AND THE SUBNETS FOR YOUR OWN
# ENVIRONMENT! Remember that the IP address of 192.168.190.1 for the router, and
# the netmask 255.255.255.0 is equal to the network range/CIDR of 192.168.190.0/24
# for the purposes of these rules.
sudo iptables -t nat -A POSTROUTING -s 192.18.200.0/24 ! -d 192.168.200.0/24 -j MASQUERADE
rendere persistente la configurazione di iptables con il comando:
sudo apt-get install iptables-persistent
avendo cura di salvare le regole per IPv4 e IPv6
ecco cosa si è venuto a realizzare: